
DIY Vinyl Plank Installation
Professional Vinyl Plank Installation Services
How to Install Ustik Vinyl Plank Flooring
Vinyl floor planks offer a durable, long-lasting and cost-effective flooring option to those who are looking to change the look of their space. This unique flooring option stands out in terms of its strength, endurance and ease of installation. When vinyl floor planks come to self adhesive vinyl installation, you can ensure a neat and well-fitted look before putting much effort into the process.
Installing Ustik DIY vinyl planks products has never been easier. Say goodbye to tedious and expensive installation costs. Simply follow our helpful self adhesive vinyl installation guide and you’ll be set up in no time!
This page contains the do-it-yourself vinyl plank flooring installation guides for all our products along with their features, tips for how to best put them to use on your property and more information about where they work best - so there's absolutely no way that installing vinyl planks could ever become tedious again.
Video installation
The Ustik® is easy to lay, peel and stick- anyone could do it! Watch our step-by-step video to see just how easy it is.
Installation Guidelines
Ustik Luxury Vinyl Planks
General
For installing vinyl plank flooring, we recommend ordering all vinyl plank floors for installation for the same flooring project at the same time. The compatibility of planks in repeated orders cannot be guaranteed.
Make sure the DIY vinyl planks are sufficiently mixed when you install them so that you don’t end up with too many identical, light or dark planks in the same area.
Check all planks in daylight before and during installation. Defective planks must never be used.
The floor should preferably be installed parallel to how the light enters the room.
Ensure that the end joints of the planks in 2 successive rows are never in a line. Always ensure that the joints are staggered by at least 15cm (6 inches).
During the installation procedure ensure that the indoor climate conditions are always kept between 18 - 25°C.
To ensure professional self adhesive vinyl installation, it is also important to keep the subfloor in the above-mentioned temperature range to counteract dimensional variations.
Floor heating can be used with Ustik Luxury Vinyl Planks up to a maximum contact temperature of 27°C. Switch off your floor heating 24h before and after installation.
For best results after installation, premises should be kept in a temperature range of 15 - 28°C.
Storing and handling
Always handle, store and transport Ustik Luxury DIY vinyl plank flooring planks carefully to prevent distortions. Store and transport cartons on a flat surface in neat stacks, store cartons flat, and never put them upright.
Do not store Ustik Luxury Vinyl Planks in moist or dusty rooms or places with extreme temperatures.
Ustik Luxury Vinyl Planks must be allowed to acclimatise in the room of installations. Planks must be stored between 18°C - 25°C, for a period of at least 48 hours before installation. The temperature needs to be maintained prior to, during and for at least 24 hours after installation is completed. Cartons should be acclimatised next to each other on a flat surface.
Opening the ends of boxes to assist acclimatisation is recommended
Subfloor
To be in accordance with the current Australian Standard “Floor Coverings –1884-2012 Resilient Sheet & Tiles – Laying & Maintenance Practices,” all surfaces to be bonded should be absorbent, dry, smooth, intact and clean.
Sub-floors should be free from wax, grease, paint, previously-used adhesive, curing compounds, hydrostatic pressure and any other impurities that may affect adhesion.
The minimum subfloor temperature before commencing surface preparation and application is 10o C.
It is recommended to test all concrete substrates for moisture content, according to the current Australian Standards prior to your DIY installing vinyl plank flooring installation.
Prior to installation
Soft floorcoverings
All soft floor coverings and its debris should be removed before installation. (E.g. Carpet, underlay).
Concrete floor
Whilst not always required, it is recommended Indentations and uneven concrete subfloors should be treated with the appropriate cementitious screed or levelling compound and be in accordance with manufacturer’s recommendations and guidelines.
If a high moisture content is prevalent, an appropriate moisture barrier/sealant is recommended to be applied during vinyl plank installation in accordance with the manufacturer’s instructions.
Concrete substrate moisture content details are available in the current Australian Standard “Floor Coverings - 1884-2012 Resilient Sheet & Tiles - Laying & Maintenance Practices” The moisture content of the subfloor should not exceed 75% RH (In-Situ Probe test method.)
Wood flooring (timber)
Carefully remove all debris (including loose nails), sweep and vacuum. The timber floor now needs to be sheeted with a timber underlayment such as Ply Board or Masonite. Vinyl and Cork cement sheets should be used in wet areas.
Refer to Timber Underlayment manufactures installation guidelines and recommendations.
Tile flooring
If necessary, use a levelling compound to level all joints between the tiles. Preferably apply a second levelling layer. Sanding to smooth the joints is recommended with a primer applied to these areas to assist plank adhesion.
Install planks and roll to ensure good adhesion

1. Installing DIY vinyl plank flooring and then rolling over the whole area will help ensure effective adhesion. Preferably install the panels parallel with the direction of the sunlight.

2. Measure the room and find the centre line. Starting the installation from the centre line ensures a straight and symmetrical installation. If necessary you can shift the starting point to prevent any unnecessary small cuts. Ustik Luxury Vinyl Planks can easily be cut with a cutter or utility knife with the décor side face up.

3. Dry lay one plank per row leaving plastic backing on from this centre line to the wall and ensure no small cuts are needed. Take away these planks.

4. Then start the installation from the centre line. Mix up the panels to become a nice pattern.
5. It is strongly recommended to stagger the rows so that the short edge seams are not in a straight uniform line.
6.Place each plank in place, with pressure applied over each plank.
7. Use the same procedure to complete the other side of the room.
8. Next, roll the complete floor to ensure good adhesive transfer.
Precautions
Ustik Luxury DIY vinyl planks were designed for interior installations and only in temperature-controlled environments. Ustik Luxury Vinyl Planks cannot be installed in solariums, over carpets, or any exterior application (including seasonal porches and boats.)
It is recommended to avoid direct sunlight exposure as much as possible. Direct sunlight exposure may damage the floor as colour changes might occur.
Ustik Luxury Vinyl Planks can have a dimensional deviation. Visually perceiving joints is a characteristic of the product.
Flooring mats and furniture should be moved from time to time to avoid permanent colour changes.
Ustik Luxury Vinyl Planks are not intended for use on any vertical surface.
Provide furniture feet with appropriate feet protectors.
Castor chairs must be provided with soft free-turning, non-rubber wheels and/or office castor mats can be installed.
Do not allow pets with sharp nails to walk on the floor as these nails may cause deep scratches.
Make sure furniture legs have a large surface and are provided with non-straining floor protectors. The taller and/or wider the furniture feet are the greater the repartition of the weight will be on the floor and the less chance there is to damage the floor. This will reduce the damage
Prolonged contact with rubber can cause a permanent stain.
Do not allow cigarettes, matches or other very hot items to contact the floor as this may cause permanent damage.
Place mats at outside entrances to prevent dirt, grit and soil from being tracked onto your floor. This will reduce damages, the maintenance requirement and extend the life of your floor.
Maintenance
First cleaning after installation
First remove all dirt and dust from the flooring with a brush or vacuum cleaner. Then clean with water and a neutral appropriate cleaning agent, at least twice (or until the water stays clean.)
Periodic cleaning and maintenance
Regular cleaning keeps your DIY vinyl plank flooring beautiful. Clean the floor frequently in function of its use. Always remove immediate grit, sharp objects, staining agents, moisture or aggressive substances from the flooring. Routine cleaning can easily be done by sweeping, vacuum cleaning or damp wiping.
Repairs
Ustik Luxury DIY vinyl planks may be replaced by prying up at a corner of the plank with a Utility knife. This may require some force due to the adhesion of the pressure sensitive glue. It is important to be careful not to mark adjacent planks during this process. Remove and replace with new planks as you go.
Note: separation of the joints is a natural look of the product that will not require replacement
ULay Loose Lay Vinyl Planks
General
We recommend ordering all planks for the same flooring project at the same time. Compatibility of planks in repeated orders cannot be guaranteed.
Make sure the planks are sufficiently mixed when you install them, so that you don’t end up with too many identical, light or dark planks in the same area.
Check all planks in daylight before and during installation. Defective planks must never be used.
The floor should preferably be installed parallel to how the light enters the room.
Ensure that the end joints of the planks in 2 successive rows are never in a line. Always ensure that the joints are staggered by at least 15cm (6 inches).
Ensure that the indoor climate conditions are always kept between 18 - 25°C.
It is also important to keep the subfloor in the above mentioned temperature range to counteract dimensional variations.
Floor heating can be used with ULay Luxury Vinyl Planks up to a maximum contact temperature of 27°C. Switch off your floor heating 24h before and after installation. For subfloor preparation see floor heating instructions below.
Storing and handling
Always handle, store and transport ULay Luxury Vinyl Planks carefully to prevent distortions. Store and transport cartons on a flat surface in neat stacks, store cartons flat, never put them upright.
Do not store ULay Luxury Vinyl Planks in moist or dusty rooms or places with extreme temperatures.
ULay Luxury Vinyl Planks must be allowed to acclimatise in the room of installations. Planks must be stored between 18°C - 25°C, for a period of at least 48 hours before installation. The temperature needs to be maintained prior to, during and for at least 24 hours after installation is completed. Cartons should be acclimatised next to each other on a flat surface.
Subfloor
To be in accordance with the current Australian Standard “Floor Coverings - 1884-2012 Resilient Sheet & Tiles - Laying & Maintenance Practices”
All surfaces to be bonded shall be absorbent, dry, smooth, sound and clean.
Subfloors should be free from; wax, grease, paint; previously used adhesive, curing compounds, hydrostatic pressure and any other impurities that may affect adhesion.
The minimum subfloor temperature before commencing surface preparation and application is 10o C. It is recommended to test all concrete substrates for moisture content, according to the current Australian Standards prior to the installation of any works.
It is recommended Indentations and uneven concrete subfloors should be treated with the appropriate cementitious screed or levelling compound and be in accordance with manufacturer’s recommendations and guidelines.
Uneven subfloor will leave marks in ULay Luxury Vinyl Planks
Prior to installation
Soft floorcoverings
All soft floor coverings and its debris should be removed before installation. (eg. Vinyl, carpet, linoleum, cork).
Concrete floor
Test all concrete substrate flooring for moisture content, according to the current Australian Standard “Floor Coverings - 1884-2012 Resilient Sheet & Tiles - Laying & Maintenance Practices” prior to the installation of any floorcoverings.
The moisture content of the subfloor should not exceed 75% RH (In-Situ Probe test method.)
If the moisture content is higher, an appropriate moisture barrier / sealer is recommended to be applied and in accordance to the manufacturer’s instructions. Always measure, record and keep your test results. It is recommended Indentations and uneven concrete subfloors should be treated with the appropriate cementitious screed or levelling compound and be in accordance with manufacturer’s recommendations and guidelines.
Wood flooring (timber)
Carefully remove all debris (including loose nails), sweep and vacuum. The timber floor now needs to be sheeted with a timber underlayment such as Ply Board or Masonite.
Refer to Timber Underlayment manufacturer's installation guidelines and recommendations
Tile flooring
If necessary, use a levelling compound to level all joints between the tiles. Preferably apply a second levelling layer.
INSTALLATION
Install planks and roll to ensure good adhesion
Preferably install the panels parallel to the direction of the sunlight.
Measure the room and find the centre line. Starting the installation from the centre line ensures a straight and symmetrical installation. If necessary you can shift the starting point to prevent any unnecessary small cuts. ULay Luxury Vinyl Planks can easily be cut with a cutter or utility knife with the décor side face up.
Dry lay one plank per row (without adhesive) from this centre line to the wall and ensure no small cuts are needed. Take away these planks.
Then start the installation from the centre line. Mix up the panels to become a nice pattern.
It is strongly recommended to stagger the rows so that the short edge seams are not in a straight uniform line.
Now all panels of the rows are ready to be installed on the glue without unnecessary waiting time.
Pull back the rows of panels and apply glue to the floor using an V1 ( 1.6mm x 1.6mm ) Notched trowel. It is strongly recommended to use Roberts R285 FR glue, which has especially been developed for the installation of ULay Luxury Vinyl Planks.
Respect a minimum evaporation time of the Vinyl glue of 5 to 10 minutes.
Then place planks into the wet film of adhesive and roll to ensure good adhesive transfer has occurred. All glue residues should immediately be removed with a damp cloth, never use detergents.
Use the same procedure to complete the other side of the room.
Roll the complete floor to ensure good adhesive transfer.
Leave the floor for 24 hours after installation between 18°C - 25°C.
Precautions
ULay Luxury Vinyl Planks are designed for interior installations and only in temperature controlled environments. ULay Luxury Vinyl Planks cannot be installed in solariums, over carpets, or any exterior application including seasonal porches, camping trailers and boats.
It is recommended to avoid direct sunlight exposure as much as possible. Direct sunlight exposure may damage the floor as colour changes might occur.
ULay Luxury Vinyl Planks can have a dimensional deviation. Visually perceiving joints is a characteristic of the product.
Flooring mats and furniture should be moved from time to time to avoid permanent colour changes.
ULay Luxury Vinyl Planks are not intended for use on any vertical surface.
Provide furniture feet with appropriate feet protectors.
Castor chairs must be provided with soft free-turning, non-rubber wheels and/or office castor mats can be installed.
Do not allow pets with sharp nails to walk on the floor as these nails may cause deep scratches.
Make sure furniture legs have a large surface and are provided with non-straining floor protectors. The taller and/or wider the furniture feet are the greater the repartition of the weight will be on the floor and the less chance there is to damage the floor. This will reduce the damage
Prolonged contact with rubber can cause a permanent stain.
Do not allow cigarettes, matches or other very hot items to contact the floor as this may cause permanent damage.
Place mats at outside entrances to prevent dirt, grit and soil from being tracked onto your floor. This will reduce damages, the maintenance requirement and extend the life of your floor.
Ustik Rubber Underlay
INSTALLATION INSTRUCTIONS
Ustik® rubber underlay is suitable for most types of Luxury Vinyl Tiles (LVT), carpet tiles, ceramic tiles and other plank flooring products.
Surface Preparation
It is important the sub-floor must be sufficiently level for imperfections not to be visible under Ustik underlay, and the surface must be dry. Since Ustik® rubber underlay has an inbuilt TPU moisture barrier it can be used over concrete sub-floors without the need for damp proof membrane.
Installation Process
Before starting the installation, always follow the LVT or tile manufacturer’s conditioning recommendations carefully (conditioning should never be less than 48 hours). The Ustik® underlay must also be conditioned together with the LVTs for the same length of time, in the location where the installation will take place. It is important to control the internal temperature and humidity during and following the installation. The LVTs should be allowed to condition in accordance with the current Australian Standard “Floor Coverings - 1884- 2012 Resilient Sheet & Tiles - Laying & Maintenance Practices”

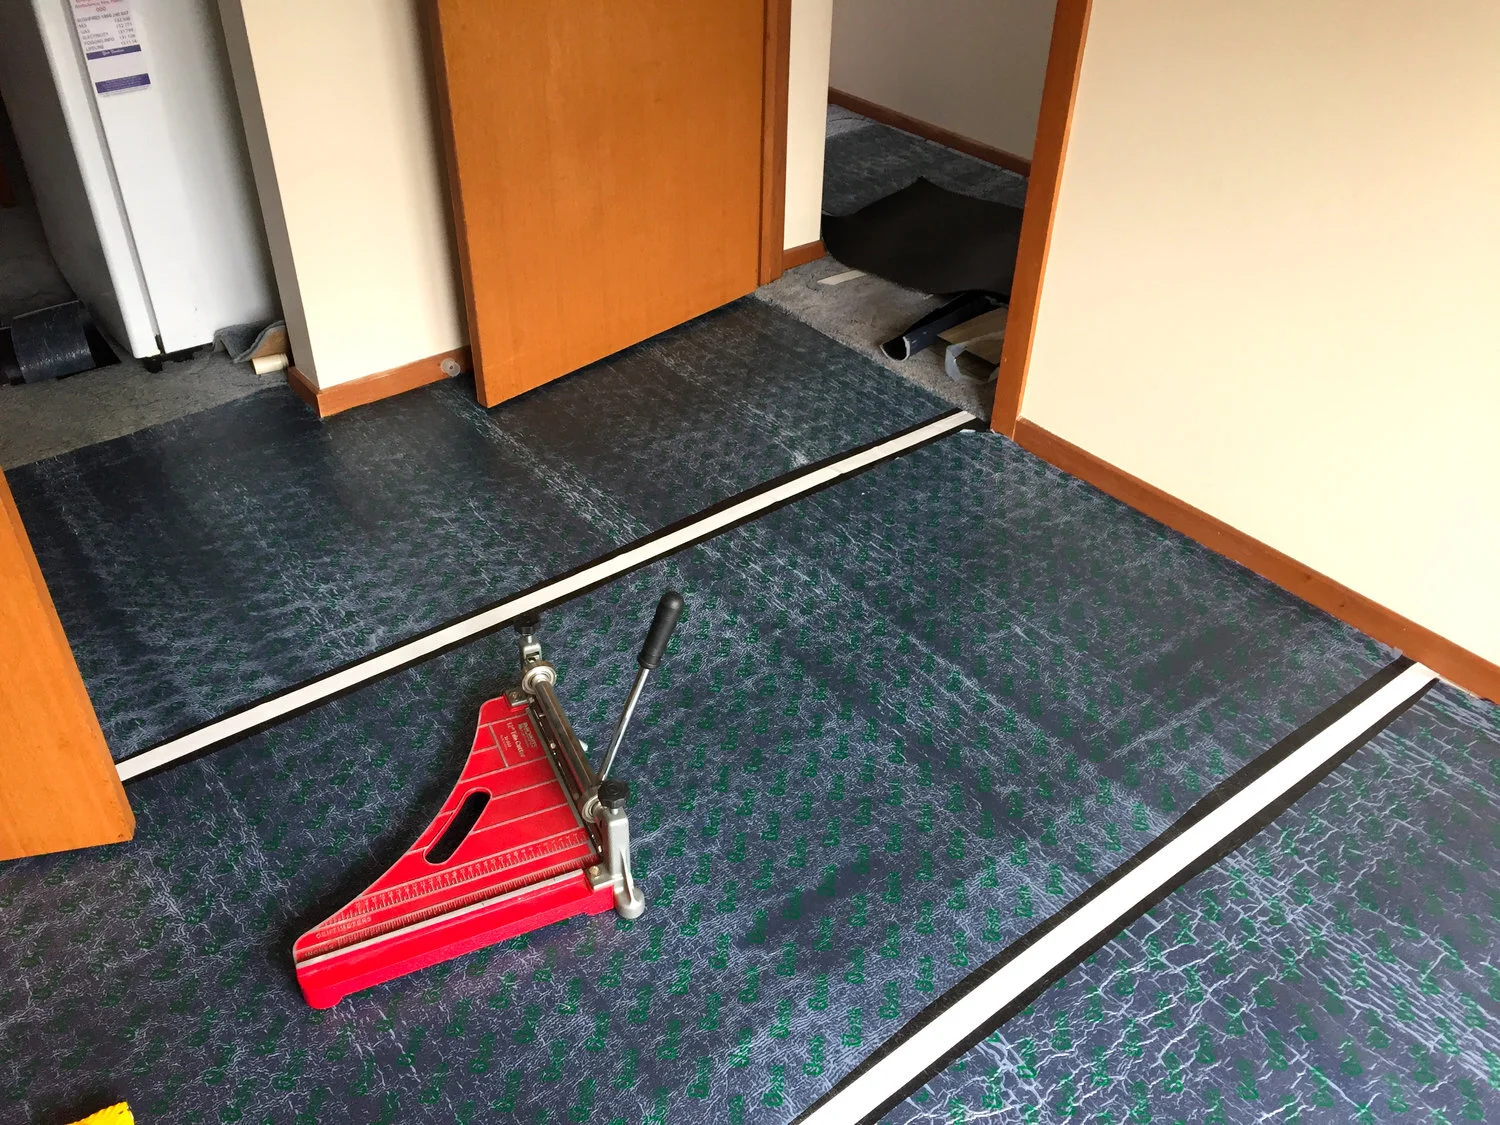
1. Roll out and position the Ustik® rubber underlay with the TPU layer facing downwards and the release film facing upwards, as per the image, in rows next to one another. DO NOT OVERLAP the Ustik® underlay. Joins must be closely butted together, and when using as a moisture barrier it is recommended to use the joining tape provided to seal the joins.
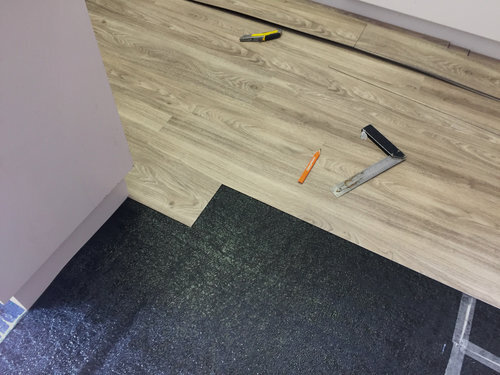
2. (TIP) Using a Utility knife lightly score through the plastic film approx. 30mm of the edge of each roll and remove plastic strip to ensure rolls butt up together.

3. Join rolls together with double sided tape supplied, as per image.
4. Cover the entire floor area to be fitted with Ustik® underlay, leaving an expansion gap between the Ustik underlay and the perimeter wall of approximately 3mm, as this will allow for expansion and contractions of this floating floor system.

5. Always ensure that the LVTs or tiles are clean and completely dust-free. If they are at all dusty, wipe them down using a clean, damp, lint-free cloth and allow them to dry off completely before installation.
6. Once you have set out the first several rows of LVTs, tiles, etc., again using a Utility knife score lightly small sections of the plastic film taking care not to cut into the rubber underlay and remove plastic film and double sided tape film prior to installation, of LVTs.
7. Begin laying the LVTs or tiles ensuring the first rows remain in place by checking the alignment is parallel to the centre line of the room. Gently place the LVTs or tiles onto the exposed rubber adhesive membrane. The bond to the adhesive membrane will increase with some downward pressure.
Ustik Deluxe Luxury Vinyl Planks
General
We recommend ordering all planks for the same flooring project at the same time. Compatibility of planks in repeated orders cannot be guaranteed.
Make sure the planks are sufficiently mixed when you install them, so that you don’t end up with too many identical, light or dark planks in the same area.
Check all planks in daylight before and during installation. Defective planks must never be used.
The floor should preferably be installed parallel to how the light enters the room.
Ensure that the end joints of the planks in 2 successive rows are never in a line. Always ensure that the joints are staggered by at least 15cm (6 inches).
During installation procedure ensure that the indoor climate conditions are always kept between 18 - 23°C.
It is also important to keep the subfloor in the above-mentioned temperature range to counteract dimensional variations.
Floor heating can be used with Ustik Deluxe Luxury Vinyl Planks up to a maximum contact temperature of 27°C. Switch off your floor heating 24h before and after installation. For subfloor preparation see floor heating instructions below.
Storing and handling
Always handle, store and transport Ustik Deluxe Luxury Vinyl Planks carefully to prevent distortions. Store and transport cartons on a flat surface in neat stacks, store cartons flat, never put them upright.
Do not store Ustik Deluxe Luxury Vinyl Planks in moist or dusty rooms or places with extreme temperatures.
Ustik Deluxe Luxury Vinyl Planks must be allowed to acclimatise in the room of installations. Planks must be stored between 18°C - 25°C, for a period of at least 48 hours before installation. The temperature needs to be maintained prior to, during and for at least 24 hours after installation is completed. Cartons should be acclimatised next to each other on a flat surface.
Subfloor
To be in accordance with the current Australian Standard “Floor Coverings - 1884-2012 Resilient Sheet & Tiles - Laying & Maintenance Practices”
All surfaces to be bonded shall be absorbent, dry, smooth, sound and clean.
Subfloors should be free from; dust, dirt, wax, grease, paint, previously used adhesive, curing compounds, hydrostatic pressure and any other impurities that may affect adhesion.
The minimum subfloor temperature before commencing surface preparation and application is 10oC.
It is recommended test all concrete substrates for moisture content, according to the current Australian Standards prior to the installation of any works.
Prior to installation
Soft floorcoverings
All soft floor coverings and its debris should be removed before installation. (E.g. Carpet, underlay).
Concrete floor
Whilst not always required, it is recommended Indentations and uneven concrete subfloors should be treated with the appropriate cementitious screed or levelling compound and be in accordance with manufacturer’s recommendations and guidelines. The concrete needs to be of a smooth texture.
If a high moisture content is prevalent, an appropriate moisture barrier / sealer is recommended to be applied and in accordance to the manufacturer’s instructions.
Concrete substrate moisture content details are available in the current Australian Standard “Floor Coverings - 1884-2012 Resilient Sheet & Tiles - Laying & Maintenance Practices”
The moisture content of the subfloor should not exceed 75% RH (In-Situ Probe test method.)
Wood flooring (timber)
Carefully remove all debris (including loose nails), sweep and vacuum. The timber floor now needs to be sheeted with a timber underlayment such as Ply Board or Masonite.
Refer to Timber Underlayment manufactures installation guidelines and recommendations
Tile flooring
If necessary, use a levelling compound to level all joints between the tiles. Preferably apply a second levelling layer.
Install planks and roll to ensure good adhesion
Preferably install the panels parallel to the direction of the sunlight.
Measure the room and find the centre line. Starting the installation from the centre line ensures a straight and symmetrical installation. If necessary you can shift the starting point to prevent any unnecessary small cuts. Ustik Deluxe Luxury Vinyl Planks can easily be cut with a cutter or utility knife with the décor side face up.
Dry lay one plank per row leaving plastic backing on from this centre line to the wall and ensure no small cuts are needed. Take away these planks.
Then start the installation from the centre line. Mix up the panels to become a nice pattern.
It is strongly recommended to stagger the rows so that the short edge seams are not in a straight uniform line.
Place each plank in place, with pressure applied over each plank.
Use the same procedure to complete the other side of the room.
Roll the complete floor to ensure good adhesive transfer.
Precautions
Ustik Deluxe Luxury Vinyl Planks was designed for interior installations and only in temperature-controlled environments. Ustik Deluxe Luxury Vinyl Planks cannot be installed in solariums, over carpets, or any exterior application including seasonal porches and boats.
It is recommended to avoid direct sunlight exposure as much as possible. Direct sunlight exposure may damage the floor as colour changes might occur.
Ustik Deluxe Luxury Vinyl Planks can have a dimensional deviation. Visually perceiving joints is a characteristic of the product.
Flooring mats and furniture should be moved from time to time to avoid permanent colour changes.
Ustik Deluxe Luxury Vinyl Planks are not intended for use on any vertical surface.
Provide furniture feet with appropriate feet protectors.
Castor chairs must be provided with soft free-turning, non-rubber wheels and/or office castor mats can be installed.
Do not allow pets with sharp nails to walk on the floor as these nails may cause deep scratches.
Make sure furniture legs have a large surface and are provided with non-straining floor protectors. The taller and/or wider the furniture feet are the greater the repartition of the weight will be on the floor and the less chance there is to damage the floor. This will reduce the damage
Prolonged contact with rubber can cause a permanent stain.
Do not allow cigarettes, matches or other very hot items to contact the floor as this may cause permanent damage.
Place mats at outside entrances to prevent dirt, grit and soil from being tracked onto your floor. This will reduce damages, the maintenance requirement and extend the life of your floor.
Maintenance
First cleaning after installation
First remove all dirt and dust from the flooring with a brush or vacuum cleaner. Then clean with water and a neutral appropriate cleaning agent, at least twice until the water stays clean.
First cleaning after installation
First remove all dirt and dust from the flooring with a brush or vacuum cleaner. Then clean with water and a neutral appropriate cleaning agent, at least twice until the water stays clean.
Further Installation guidelines
If you prefer the PDF versions, view our installation guidelines for in-depth information on how to install our vinyl plank flooring here.